21 Dec 2018
All of Boto3’s resource and client classes are generated at runtime. This means that you cannot directly inherit and then extend the functionality of these classes because they do not exist until the program actually starts running.
It is still possible to extend boto3 using the events system, which allows us to run custom code when boto3 events triggered, or to provide default values. It also allows us to add additional classes to the base objects.
As an example, we can add a new class for ec2.Instance to inherit from with a convenience method for reading tags:
import boto3

class InstanceExtras(object):
    def __init__(self, *args, **kwargs):
        super().__init__(*args, **kwargs)

    def get_tag(self, tag, default=''):
        if self.tags:
            all_tags = [t for t in self.tags if t['Key'] == tag]
            if all_tags:
                return all_tags[0]['Value']
        return default

def add_custom_instance_class(base_classes, **kwargs):
    base_classes.insert(0, InstanceExtras)

session = boto3.Session(*args, **kwargs)
session.events.register(
    'creating-resource-class.ec2.Instance',
    add_custom_instance_class
)
This new session object can then be used normally, and whenever an ec2.Instance is returned it will inherit our new method.
ec2 = session.resource('ec2')
instance = ec2.instances(InstanceId='i-123456abc')
name = instance.get_tag('Name') # Will return the Name tag
14 Dec 2018
The recent security vulnerability in the Logitech Options app prompted me to see if I could achieve the same functionality without it. All I really care about is to bind the 4th and 5th buttons (the ones on the side by the second scroll wheel) to back and forward in Chrome, and the 6th button (the thumb rest) to open Mission Control. I’m already using Hammerspoon for a few things, so this seemed like the best place to start.
After a bit of digging it turns out that the thumb rest button is sending Ctrl + Alt + Tab, which can be easily bound to opening the Mission Control app:
hs.hotkey.bind({"alt", "ctrl"}, "Tab", function()
    hs.application.launchOrFocus("Mission Control.app")
end)
To capture the mouse buttons we can use hs.eventtap, and send the back and forward shortcuts if the current application is chrome:
hs.eventtap.new(hs.eventtap.event.types.middleMouseUp, function(event)

    button = event:getProperty(hs.eventtap.event.properties.mouseEventButtonNumber)

    current_app = hs.application.frontmostApplication()
    google_chrome = hs.application.find("Google Chrome")

    if (current_app == google_chrome) then
        if (button == 3) then
            hs.eventtap.keyStroke({"cmd"}, "[")
        end

        if (button == 4) then
            hs.eventtap.keyStroke({"cmd"}, "]")
        end
    end
end):start()
30 Nov 2018
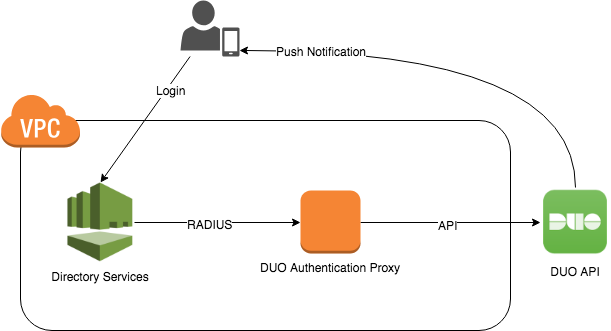
I recently had to add a second factor to an AWS Workspaces environment. We use AWS Managed Microsoft AD for the Workspaces directory, which can be configured to call an external RADIUS server for secondary authentication. Since we are already using DUO for other systems, I used the Duo Authentication Proxy to provide this second factor.
The proxy needs to be built from source. For example, on Ubuntu:
apt-get install build-essential libssl-dev python-dev libffi-dev
wget https://dl.duosecurity.com/duoauthproxy-latest-src.tgz
tar xzf duoauthproxy-latest-src.tgz
cd duoauthproxy-*-src
make
cd duoauthproxy-build
./install
Configuration of the DUO client is fairly straightforward. We just need to update /opt/duoauthproxy/conf/authproxy.cfg with our DUO API credentials, the IP addresses of the two domain controllers, and the RADIUS secret we want to use. Note that directory services only supports a single RADIUS secret used by all domain controllers, so just enter the same one twice.
[duo_only_client]
; This section has no settings

[radius_server_auto]
client=duo_only_client
port=1812
ikey=<duo_integration_key>
skey=<duo_secret_key>
api_host=<duo_api_host>

radius_ip_1=<dc1_ip_address>
radius_secret_1=<radius_secret>
radius_ip_2=<dc2_ip_address>
radius_secret_2=<radius_secret>

failmode=secure
allow_concat=false
factors=push
Finally we can configure directory services to use the DUO proxy as a second factor. This is simplest in the console, but can also be done via the command line:
cat > settings.json <<EOF
{
    "RadiusServers": ["<dc1_ip_address>", "<dc2_ip_address>"],
    "RadiusPort": 1812,
    "RadiusTimeout": 30,
    "RadiusRetries": 4,
    "SharedSecret": "<radius_secret>",
    "AuthenticationProtocol": "PAP",
    "DisplayLabel": "DUO",
    "UseSameUsername": true
}
EOF

aws ds enable-radius --directory-id <directory-id> --cli-input-json file:///settings.json
11 Nov 2018
“There are three types of lies: Lies, damned lies, and service status pages”
I had a great time at DevOps Days 2018 in Wellington earlier this week. Wellington really put on the weather (and craft beer), and the organisers ran an excellent conference. I really appreciated the decision to allow opting out of the conference T-Shirt in favour of a donation to charity. As much as I love my swag I really don’t need any more black T-Shirts with tech logos!
Jeff Smith opened the proceedings with Moving from Ops to DevOps: Centro’s Journey to the Promiseland, which had some great practical tips on measuring toil and making sure you’re asking the right questions. François Conil’s talk Monitoring that cares spoke about the end of user based monitoring, and humane, actionable alerts. I also really enjoyed Ryan McCarvill’s fascinating talk Fighting fires with DevOps on the challenges of fitting out fire trucks for Fire & Emergency NZ with a modern cloud based incident response system.
Matt Brown held a really interesting workshop on risk prioritisation from the point of view of a SRE. By calculating the expected ‘cost’ of an outage in downtime minutes per year, we can compare these against our error budget to determine if they fit our risk model.
Jessica DeVita closed out the conference with a deep dive into her research on retrospectives. After an incident we tend to put most of our attention ‘below the line’ of our systems diagrams, and far less ‘above the line’, at the people and processes operating those systems. One cannot exist without the other, so we need to strive for a culture of blamelessness and empathy in our incident response processes in order to learn about and improve the resiliency of our systems - above and below the line.
In no particular order, here’s a list of links mentioned that I still need to dive into properly, and a few books I’ve added to my reading list.

Drive
Daniel H. Pink
Most people believe that the best way to motivate is with rewards like money—the carrot-and-stick approach. That's a mistake, says Daniel H. Pink. In this provocative and persuasive new book, he asserts that the secret to high performance and satisfaction-at work, at school, and at home—is the deeply human need to direct our own lives, to learn and create new things, and to do better by ourselves and our world.

The Field Guide to Understanding 'Human Error'
Sidney Dekker
The Field Guide to Understanding ’Human Error’ will help you understand a new way of dealing with a perceived 'human error' problem in your organization. It will help you trace how your organization juggles inherent trade-offs between safety and other pressures and expectations, suggesting that you are not the custodian of an already safe system.
Testing in Devops
Katrina Clokie
As organisations shift to a culture of intense collaboration and rapid delivery, the expectations on testers are changing. What does testing look like in an environment with automated build and deployment pipelines? How does appetite for risk change once a product can be tested in production? Who should testers look to connect with across the organisation and how can they work together effectively to deliver quality software?
19 Jun 2018
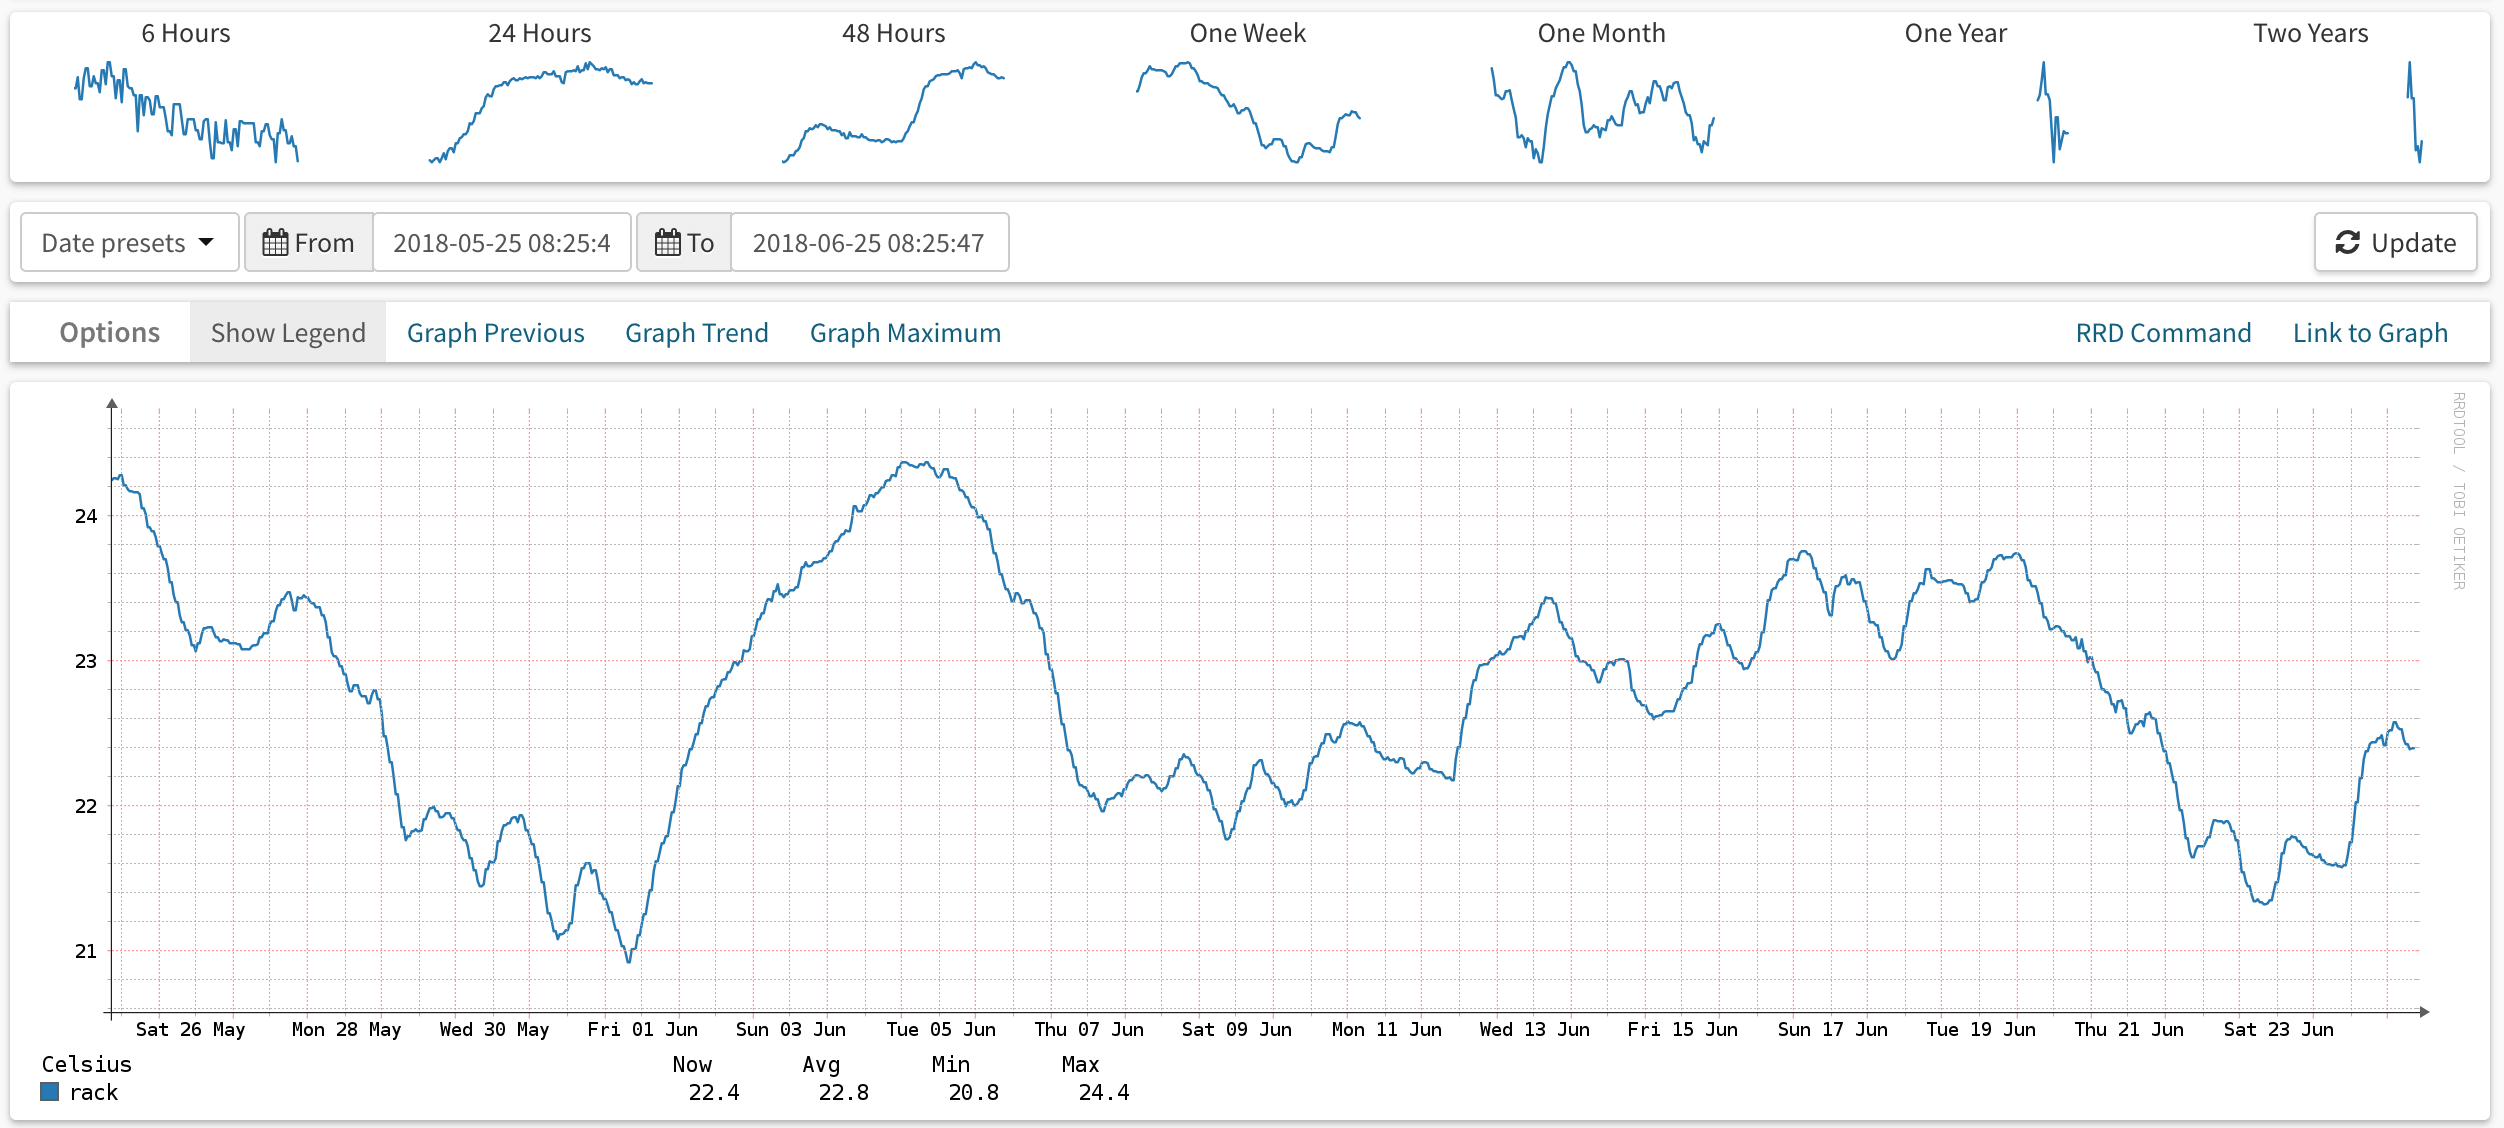
I came across the Yoctopuce USB sensors recently and thought it might be fun to use one to monitor the closet I keep my network rack & servers in. I picked up one of the Yocto-Meto sensors, which combines humidity, pressure, and temperature sensors, and hooked it up to the server with a USB cable.
Observium primarily deals with SNMP, but also includes a Unix Agent which allows it to collect other system and application metrics. The agent essentially executes a folder full of shell scripts, each of which is responsible for writing some application or service metrics to stdout.
I wrote a short python script to poll the sensor and output the current values using the unix agent format, and saved it to /usr/local/lib/observium-agent/yoctopuce:
The agent is normally configured to execute using xinetd. On macOS we can use launchctl to listen on a port and execute our script by adding the following to ~/Library/LaunchAgents/org.observium.agent.plist and enabling it with launchctl load ~/Library/LaunchAgents/org.observium.agent.plist.
After loading the agent it can be tested by running telnet 127.0.0.1 36602, which will spit out the output of the script above and then disconnect.
<<<yoctopuce>>>
temperature:rack:20
humidity:rack:55
pressure:rack:1.016
It took me a bit of digging around to work out what I needed to change to get this data into Observium. I’m running the CE edition, which is a bit out of date now so things could have changed since this release. Since temperature, pressure and humidity are already built in sensor types, this seems to be all that’s needed to get the sensors discovered. I saved it into /opt/observium/includes/polling/unix-agent/yoctopuce.inc.php.
After enabling unix agent polling for the server, Observium picks it up based on the <<<yoctopuce>>> header in the output and creates an RRD for each sensor.