04 Dec 2020
Pending Update Metrics
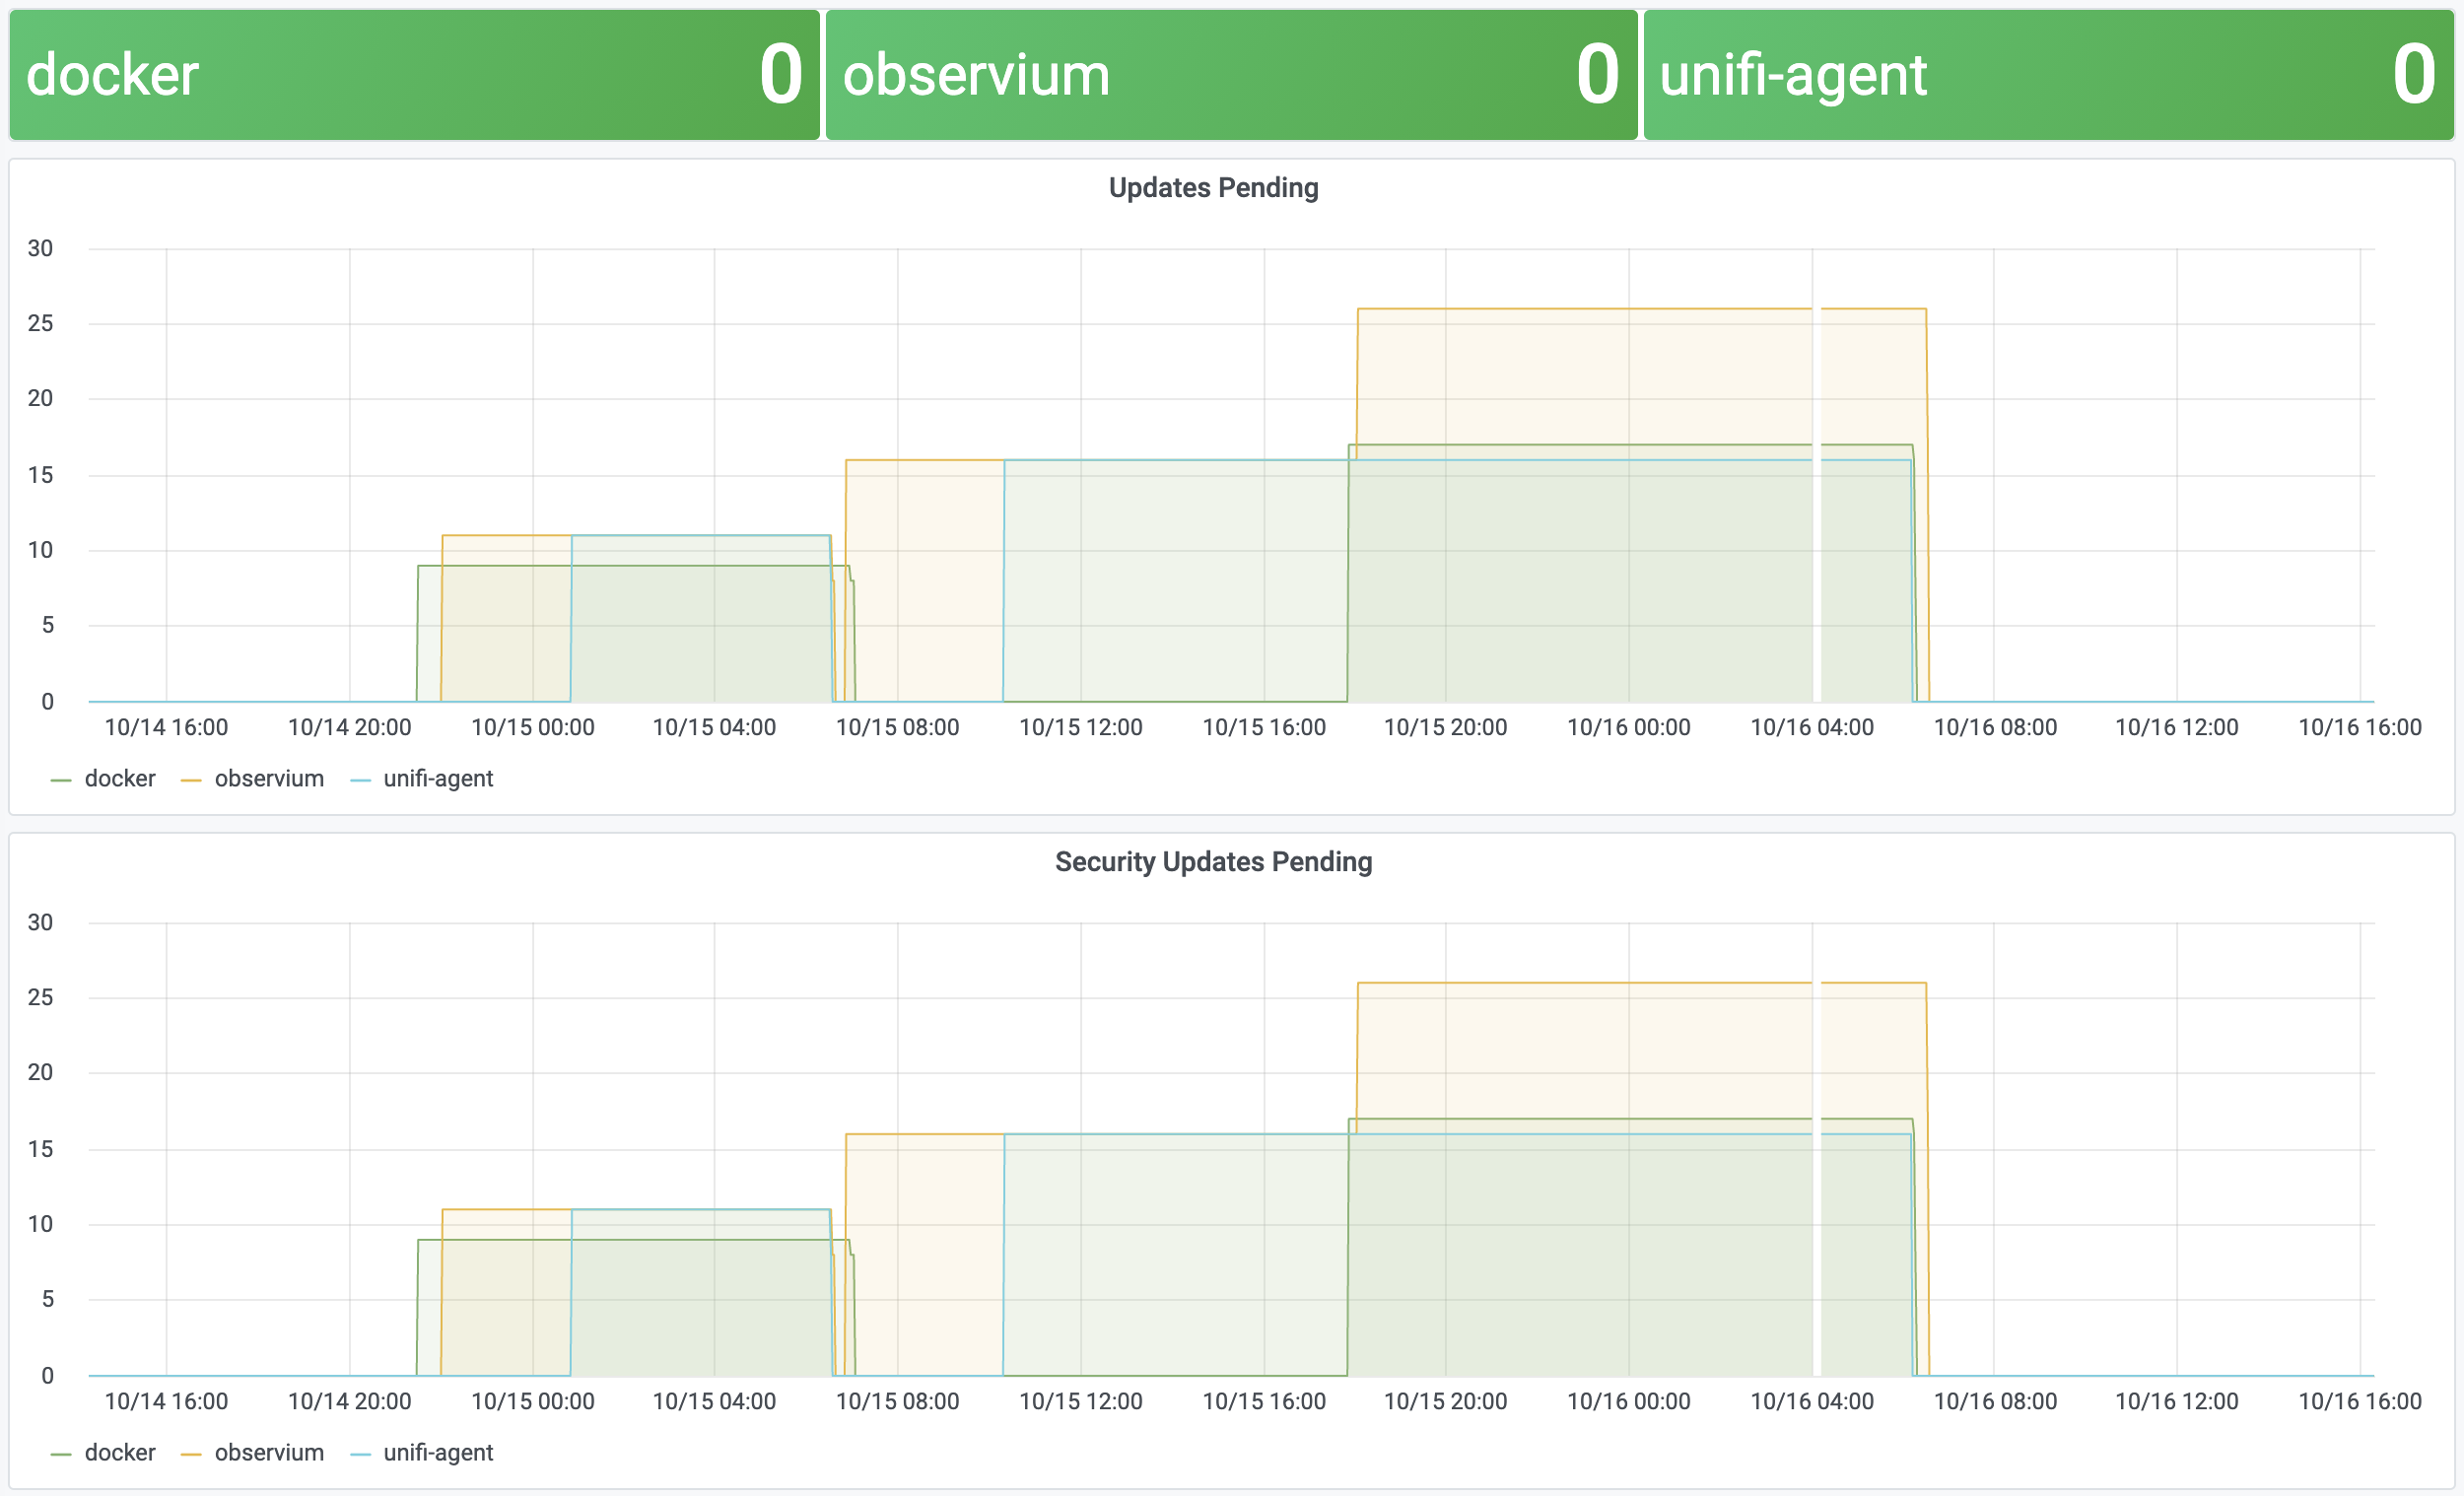
APT conveniently has some hooks available to run custom scripts before, during and after patching. We can take advantage of these to publish a metrics file that can be picked up by node_exporter to monitor the status of pending updates across our servers.
First we need a script to get the number of updates available, and if a reboot is required. We are leaning on the script in the update-notifier-common package, which outputs the number of updates, and security updates pending.
#!/bin/bash -e
# /usr/share/apt-metrics

APT_CHECK=$([ -f /var/run/reboot-required ] && /usr/lib/update-notifier/apt-check || echo "0;0")

UPDATES=$(echo "$APT_CHECK" | cut -d ';' -f 1)
SECURITY=$(echo "$APT_CHECK" | cut -d ';' -f 2)
REBOOT=$([ -f /var/run/reboot-required ] && echo 1 || echo 0)

echo "# HELP apt_upgrades_pending Apt package pending updates by origin."
echo "# TYPE apt_upgrades_pending gauge"
echo "apt_upgrades_pending ${UPDATES}"

echo "# HELP apt_security_upgrades_pending Apt package pending security updates by origin."
echo "# TYPE apt_security_upgrades_pending gauge"
echo "apt_security_upgrades_pending ${SECURITY}"

echo "# HELP node_reboot_required Node reboot is required for software updates."
echo "# TYPE node_reboot_required gauge"
echo "node_reboot_required ${REBOOT}"
We set up the APT::Update::Post-Invoke-Success and DPkg::Post-Invoke triggers to call this script, which will update our metric after each apt update run, and after each package installation step.
# /etc/apt/apt.conf.d/60prometheus-metrics
APT::Update::Post-Invoke-Success {
  "/usr/share/apt-metrics | sponge /var/lib/node_exporter/textfile_collector/apt.prom || true"
};

DPkg::Post-Invoke {
  "/usr/share/apt-metrics | sponge /var/lib/node_exporter/textfile_collector/apt.prom || true"
};
As long as APT::Periodic::Update-Package-Lists is set in /etc/apt/apt.conf.d/10periodic, pending updates will now be exported as metrics via node_exporter. If unnattended-upgrades is installed and configured the metrics will also go back down as updates are installed automatically.

Automatic Update Annotations
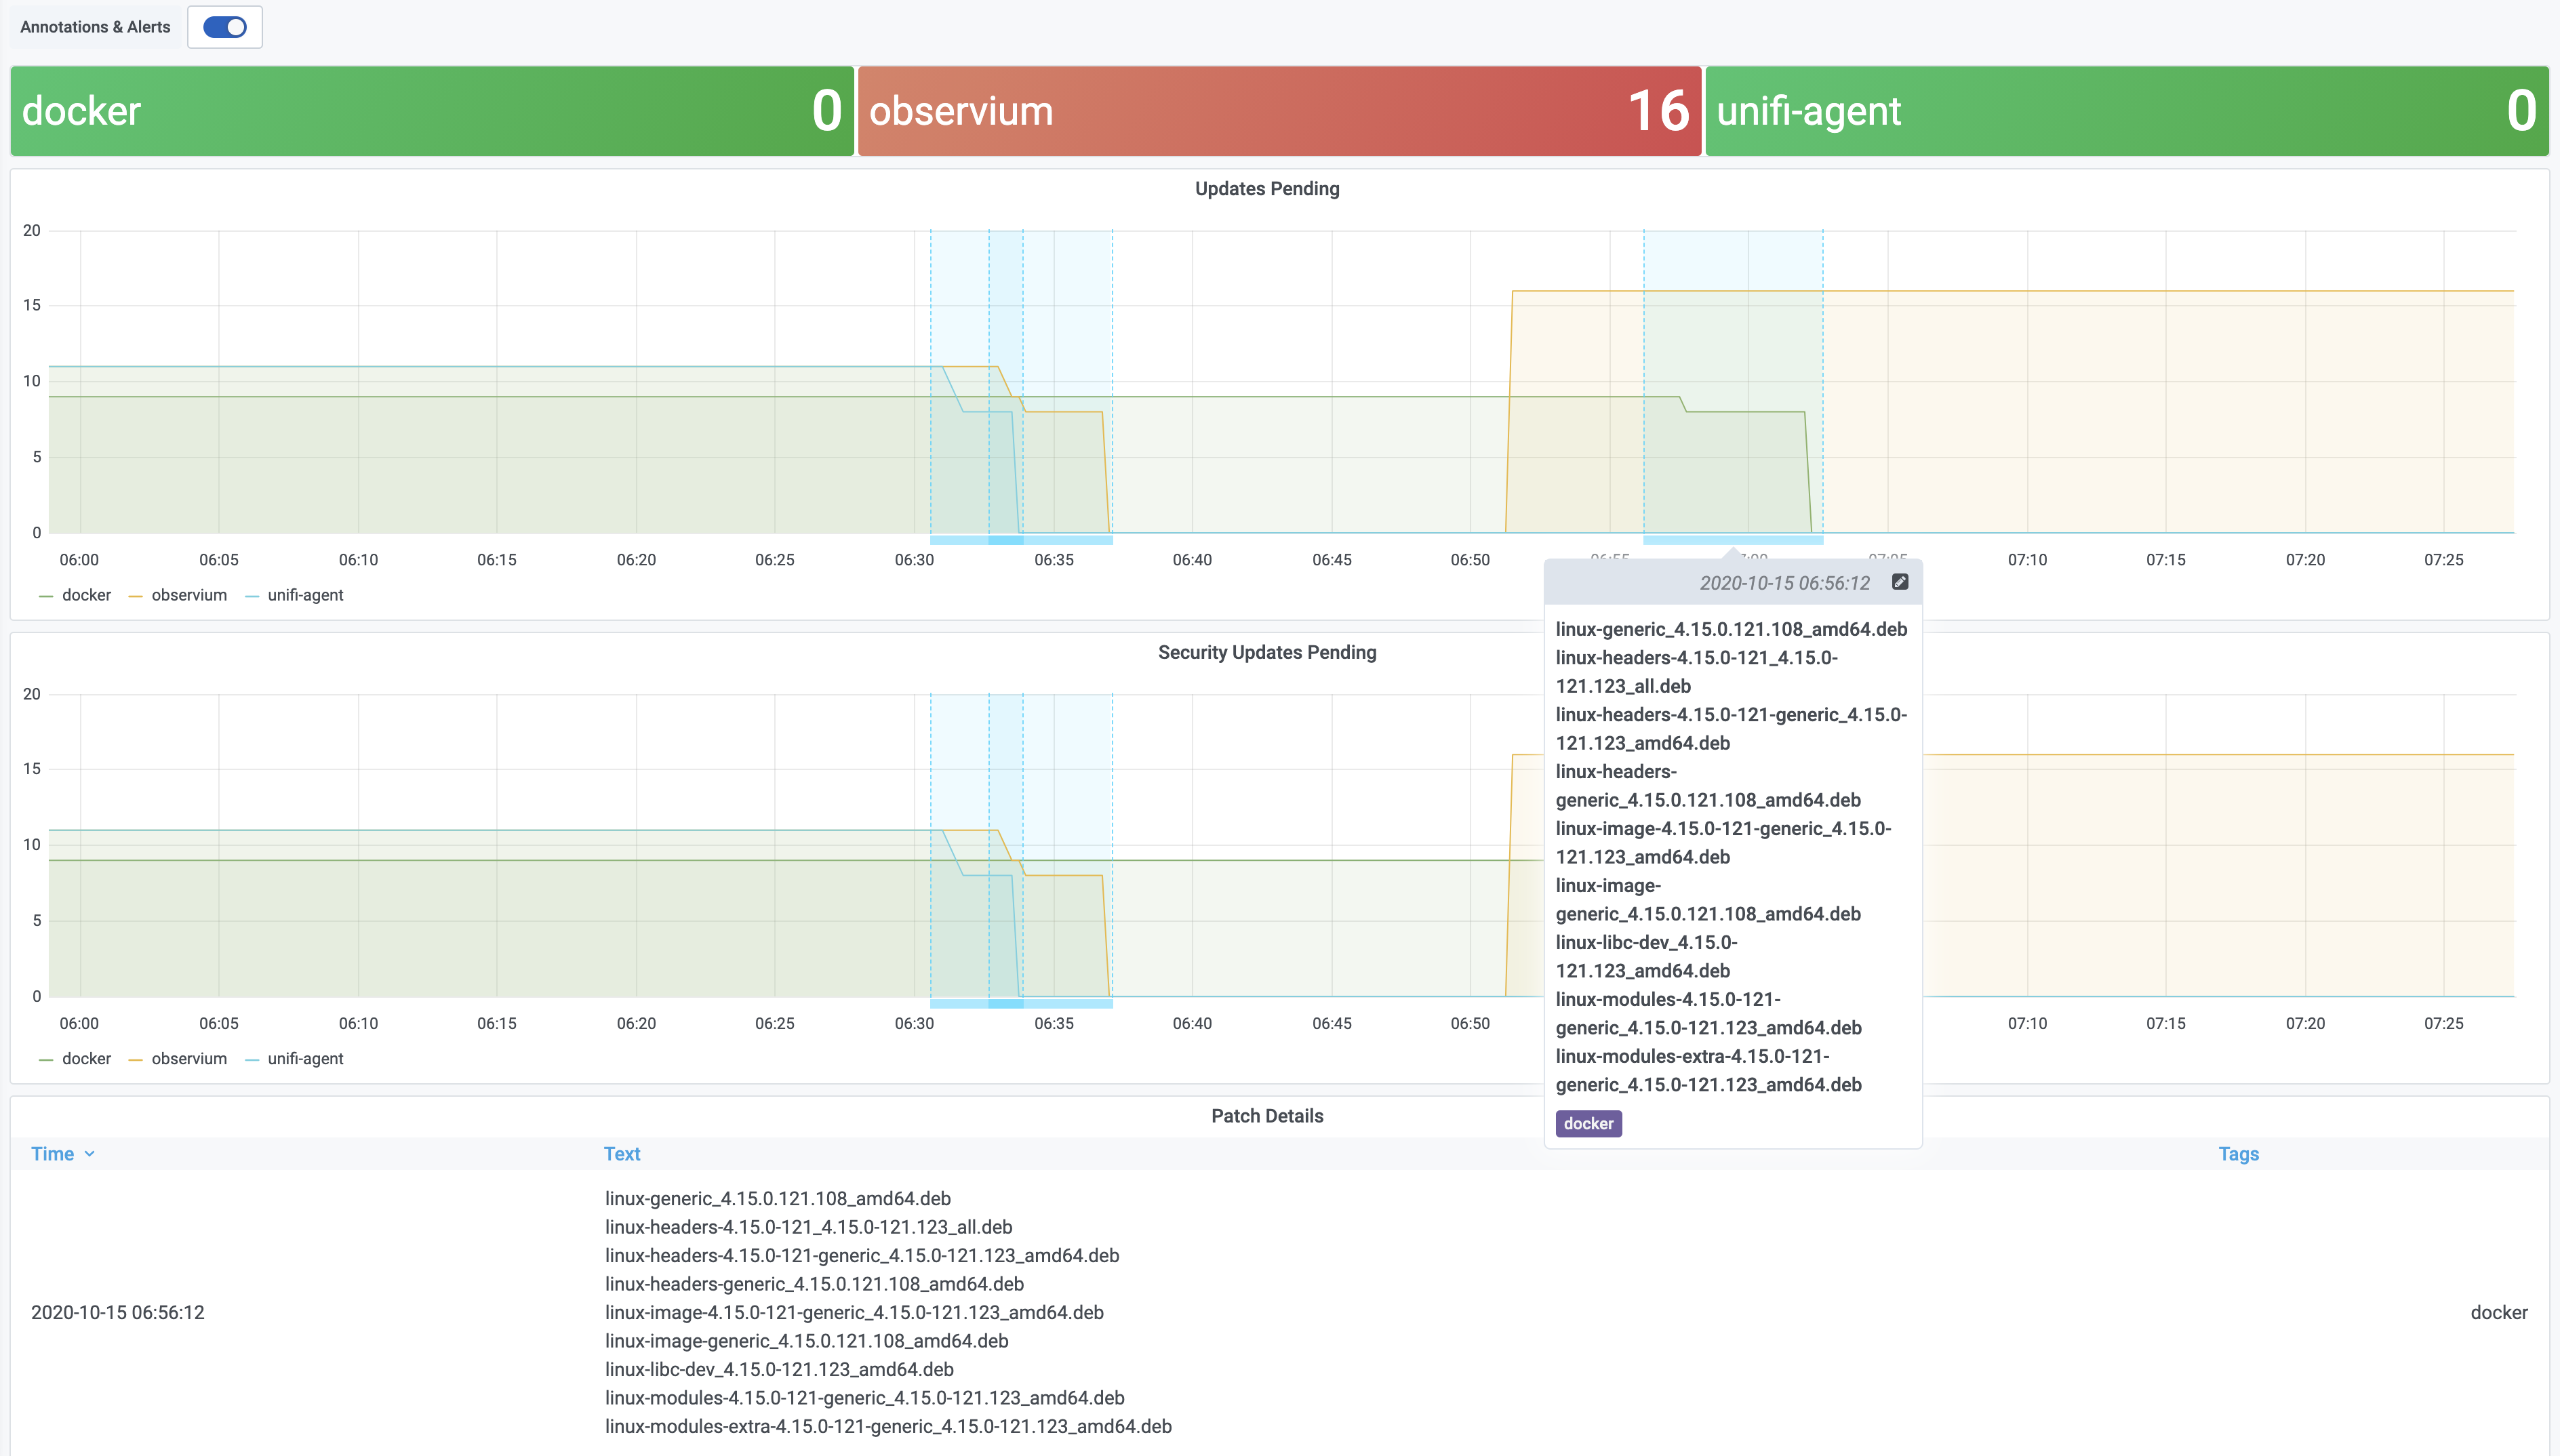
We can take it a step further and add Grafana annotations for automatic updates activity, to show what updates are being installed. These annotations are stored in Grafana, against a specific dashboard. In these examples my dasbboard ID is 3. I’ve also added a Grafana API key in /etc/environment to allow us to push annotations.
We need to add an environment file for apt-daily-upgrade.service to pass in some additional options to the apt-daily-upgrade service. This will run our /usr/share/annotate script when the update job starts and stops.
# /etc/systemd/system/apt-daily-upgrade.service.d/environment
[Service]
EnvironmentFile=-/etc/environment
ExecStartPre=-/usr/share/annotate -d 3
ExecStartPost=-/usr/share/annotate
We also add another apt hook to record the details of each package before it is installed. This will be pushed as the body of the annotation once the apt run is complete.
# /etc/apt/apt.conf.d/60annotations
DPkg::Pre-Install-Pkgs {
	"/usr/share/annotate -p - || true";
};
The annotate script does most of the work. When updates start it creates an annotation in Grafana, and keeps a record if it under /var/run. When patching is complete the script updates the annotation to add an end time, and updates the body of the annotation with the details of the installed patches. The script calls grafana-annotation.py to create the annotations, which is a simple wrapper around the annotation API calls.
#!/bin/bash -e
# /usr/share/anotate

while getopts ":d:p:" opt; do
    case $opt in
        d)
            DASHBOARD="$OPTARG"
            ;;
        p)
            PATCH="$OPTARG"
            ;;
        \?)
            echo "Invalid option -$OPTARG" >&2
            exit 1
            ;;
        :)
            echo "Option -$OPTARG requires an argument." >&2
            exit 1
            ;;
    esac
done

ANNOTATE=/usr/share/grafana-annotation.py
ANNOTATION_TMP=/var/run/unattended-upgrades-annotation.json
ANNOTATION_LOG=/var/run/unattended-upgrades-annotation-log

urldecode() { : "${*//+/ }"; echo -e "${_//%/\\x}"; }

if [[ -n "${DASHBOARD}" ]]; then
    echo "Annotating dashboard ${DASHBOARD}"
    # Create the start annotation
    ${ANNOTATE} --dashboard "${DASHBOARD}" --message "Unattended upgrades started." --output "${ANNOTATION_TMP}"
    exit 0
fi

if [[ -f ${ANNOTATION_TMP} ]]; then
    if [[ -n "${PATCH}" ]]; then
        echo "Input: ${PATCH}"
        if [[ "${PATCH}" = '-' ]]; then
            # Read from stdin
            PATCH=$(cat)
        fi
        echo "Recording applied patches"
        # Add to log and stop since we're not done.
        echo "${PATCH}" >> ${ANNOTATION_LOG}
        exit 0
    fi

    ANNOTATION_ID=$(jq --raw-output .id "${ANNOTATION_TMP}")
    if [[ -f ${ANNOTATION_LOG} ]]; then
        # Update the annotation
        echo "Completing annotation ${ANNOTATION_ID}"
        # Add an end time to the annotation
        COMMON_PREFIX="/var/cache/apt/archives/"
        PREFIX_LENGTH=$((${#COMMON_PREFIX} + 1))
        MESSAGE=$(cat ${ANNOTATION_LOG} | sort | uniq | cut -c ${PREFIX_LENGTH}-)
        ${ANNOTATE} --annotation "${ANNOTATION_ID}" --end "$(date +%s)" --message "${MESSAGE}"
    else
        echo "Deleting annotation ${ANNOTATION_ID}"
        ${ANNOTATE} --delete "${ANNOTATION_ID}"
    fi

    rm -f ${ANNOTATION_TMP} || true
    rm -f ${ANNOTATION_LOG} || true
    exit 0
fi

06 Nov 2020
Wrote a little script recently to send volume size metrics to prometheus. I’m already using cadvisor which provides a container_fs_usage_bytes metric with labels for container_label_com_docker_compose_project and container_label_com_docker_compose_service, but I wanted a bit more detail on where data was being used.
The script is run every minute by cron and writes the metrics to the collector.textfile.directory path used by node_exporter.
* * * * * docker-volume-metrics.sh | sponge /docker-volumes.prom

07 Jan 2020
The last CE release of Observium (19.8.10000) removed several alert transports that are now only available in their paid edition.
Since the external program transport still exists we can create a reasonable replacement for this with a simple shell script and the environment variables that Observium makes available when calling it.
This script can be installed on a server to easily send messages to slack. The only requirement is for the SLACK_WEBHOOK_URL environment variable to be set with the URL of the Slack webhook integration to use. How you set this will depend on your environment - in my lab I just put it in /etc/environment, however keep in mind that this allows all users of the system to use the webhook.
To use the script in Observium, create a new contact using the external program transport, and set the path to the following (making sure you have the path to slack.py correct at the start).
/opt/bin/slack.py -c "#alarming" -u "Observium" -i "observium" --colour "$(echo ${OBSERVIUM_ALERT_STATE} | sed 's/ALERT/danger/g' | sed 's/RECOVER/good/g')" -m "*<${OBSERVIUM_ALERT_URL}|${OBSERVIUM_ALERT_STATE}>: <$(echo ${OBSERVIUM_DEVICE_LINK} | grep -oE 'http[^"]*')|${OBSERVIUM_DEVICE_HOSTNAME}> ${OBSERVIUM_ENTITY_TYPE} ${OBSERVIUM_ENTITY_DESCRIPTION}*\n*Metric:* ${OBSERVIUM_METRICS}\n*Duration:* ${OBSERVIUM_DURATION}\n*Uptime:* ${OBSERVIUM_DEVICE_UPTIME}"

Breaking that down, since it’s a bit hard to read, first we have the script being called with the channel, username and icon /opt/bin/slack.py -c "#alarming" -u "Observium" -i "observium".
Next we set the --color parameter based on the value of $OBSERVIUM_ALERT_STATE. This adds a green or red bar to the side of the message block.
"$(echo ${OBSERVIUM_ALERT_STATE} | sed 's/ALERT/danger/g' | sed 's/RECOVER/good/g')"
Finally the actual message payload (broken down with new lines added):
"*<${OBSERVIUM_ALERT_URL}|${OBSERVIUM_ALERT_STATE}>: <$(echo ${OBSERVIUM_DEVICE_LINK} | grep -oE 'http[^"]*')|${OBSERVIUM_DEVICE_HOSTNAME}> ${OBSERVIUM_ENTITY_TYPE} ${OBSERVIUM_ENTITY_DESCRIPTION}*\n
*Metric:* ${OBSERVIUM_METRICS}\n
*Duration:* ${OBSERVIUM_DURATION}\n
*Uptime:* ${OBSERVIUM_DEVICE_UPTIME}"
This should result in alerts that look a bit like this:

If you want to customise the message you can use any of these variables which should be available in the script’s execution environment (found in includes/alerts.inc.php):
ALERT_ID
ALERT_MESSAGE
ALERT_STATE
ALERT_TIMESTAMP
ALERT_URL
CONDITIONS
DEVICE_HARDWARE
DEVICE_HOSTNAME
DEVICE_ID
DEVICE_LINK
DEVICE_LOCATION
DEVICE_OS
DEVICE_UPTIME
DURATION
ENTITY_DESCRIPTION
ENTITY_GRAPHS_ARRAY
ENTITY_ID
ENTITY_LINK
ENTITY_NAME
ENTITY_TYPE
METRICS
TITLE
08 May 2019
After adding VLAN interfaces to my server, I discovered that using the interfaces independently (eg curl --interface enp1s0.10 example.com) wouldn’t work. Because the default route on the system is via enp1s0, the router drops the packet since the gateway for enp1s0 has no route back to the source of the packet (at least I think that’s what’s happening ¯\_(ツ)_/¯). To make sure packets exit the system from the correct interface we need to add a new route table for each VLAN. We can do this using the post-up commands after defining the interfaces in /etc/network/interfaces.
An example VLAN interface might look like:
auto enp1s0.10
iface enp1s0.10 inet static
	vlan-raw-device enp1s0
	address 10.10.0.5
	netmask 255.255.255.0
	post-up ip route add 10.10.0.0/24 dev enp1s0.10 src 10.10.0.5 table 10
	post-up ip route add default via 10.10.0.1 dev enp1s0.10 table 10
	post-up ip rule add from 10.10.0.5/32 table 10
	post-up ip rule add to 10.10.0.5/32 table 10
The interface gets its own route table (table 10 for simplicity I’ve numbered these to match the VLAN tag). On that table we add a route to the 10.10.0.0/24 network from the enp1s0.10 with source address 10.10.0.5, and set the default route via 10.10.0.1. We then add two rules to use this table for all packets to or from the interface’s address.
Once the interface is up we can now use the VLAN interfaces directly.
The new route table can be shown with:
$ ip route list table 10
default via 10.10.0.1 dev enp1s0.10
10.10.0.0/24 dev enp1s0.10 scope link src 10.10.0.5
And the routing rules with:
$ ip rule list
0:	from all lookup local
32764:	from all to 10.10.0.5 lookup 10
32765:	from 10.10.0.5 lookup 10
32766:	from all lookup main
32767:	from all lookup default
12 Apr 2019
I’m in the process of rebuilding my home network, splitting the network into separate VLANs. My Ubuntu server is connected to a trunk port on my switch, and I need to create virtual interfaces to allow it to access all of the VLANs I’ve set up. It turns out this is fairly straightforward.
First we install the vlan and add the 8021q kernel module.
sudo apt-get install vlan
sudo modprobe 8021q
Next we can create the virtual interfaces, in my case they will share the enp1s0 interface:
sudo vconfig add enp1s0 10
sudo vconfig add enp1s0 20
sudo vconfig add enp1s0 30
sudo vconfig add enp1s0 40
Since I’m using DHCP for everything I set up /etc/network/interfaces as follows. You could alternatively set your virtual interfaces as static and manually configure the IP, netmask, gateway etc.
# This file describes the network interfaces available on your system
# and how to activate them. For more information, see interfaces(5).

source /etc/network/interfaces.d/*

# The loopback network interface
auto lo
iface lo inet loopback

# The primary network interface
auto enp1s0
iface enp1s0 inet dhcp

auto enp1s0.10
iface enp1s0.10 inet dhcp
	vlan-raw-device enp1s0

auto enp1s0.20
iface enp1s0.20 inet dhcp
	vlan-raw-device enp1s0

auto enp1s0.30
iface enp1s0.30 inet dhcp
	vlan-raw-device enp1s0

auto enp1s0.40
iface enp1s0.40 inet dhcp
	vlan-raw-device enp1s0
We can now bring these interfaces up, and they should be reachable from their respective VLANs:
sudo ifup enp1s0.10
sudo ifup enp1s0.20
sudo ifup enp1s0.30
sudo ifup enp1s0.40
One issue I ran into was that I couldn’t access the virtual interfaces from other VLANs. For example a client on VLAN10 could ping this server on it’s VLAN10 address, but not on VLAN20. To get around this we need to change the Reverse Path Filtering setting in /etc/sysctl.d/10-network-security.conf.
The 3 values that can be set for the key rp_filter are:
0: No source address validation is performed and any packet is forwarded to the destination network
1: Strict Mode as defined in RFC 3074. Each incoming packet to a router is tested against the routing table and if the interface that the packet is received on is not the best return path for the packet then the packet is dropped.
2: Loose mode as defines in RFC 3074 Loose Reverse Path. Each incoming packet is tested against the route table and the packet is dropped if the source address is not routable through any interface. The allows for asymmetric routing where the return path may not be the same as the source path
In my case I want incoming packets on the VLAN interfaces to be able to route to other VLANS, so we can set this to 2.
# Turn on Source Address Verification in all interfaces to
# prevent some spoofing attacks.
net.ipv4.conf.default.rp_filter=1
net.ipv4.conf.all.rp_filter=1
net.ipv4.conf.enp1s0.rp_filter=2
net.ipv4.conf.enp1s0/10.rp_filter=2
net.ipv4.conf.enp1s0/20.rp_filter=2
net.ipv4.conf.enp1s0/30.rp_filter=2
net.ipv4.conf.enp1s0/40.rp_filter=2

# Turn on SYN-flood protections.  Starting with 2.6.26, there is no loss
# of TCP functionality/features under normal conditions.  When flood
# protections kick in under high unanswered-SYN load, the system
# should remain more stable, with a trade off of some loss of TCP
# functionality/features (e.g. TCP Window scaling).
net.ipv4.tcp_syncookies=1
After restarting the networking service sudo service networking restart the server is now reachable on all interfaces.


