07 Mar 2025
With Serverless Framework v3 now end-of-life, and v4 requiring a paid license, we’ve started migrating around 100 Serverless Framework projects to use AWS Serverless Application Model (SAM). Since we aren’t using any of the SaaS features of Serverless Framework, it is to us (at a basic level) just a convenience wrapper around CloudFormation, with built in tooling to package lambdas in a variety of languages. Which is pretty much what AWS SAM is too. I made some notes of some of the quirks / differences I’ve come across so far, but it seems to be more or less a drop-in replacement for the way we’re using it.
Migrating Stacks
As long as you take care to keep the CloudFormation stack name the same, and match the “logical ID” for any resources you don’t want recreated (more on that below), everything should just apply over the top of the existing stack. This is made a lot easier by SAM supporting CloudFormation Changesets, which means we can see what it’s going to do without actually deploying the stack. Once we have a new SAM stack that looks like it’s going to work, we can run sam deploy --confirm-changeset, and SAM will upload everything and show the changeset. We can then open the CloudFormation console to look at exactly how each resource is being changed.
Name collisions and properties that trigger replacement
Some properties in CloudFormation can’t be updated without recreating the resource. We can find them by referencing the documentation for the CloudFormation resource, eg for AWS::Lambda::Function, changing the value for PackageType and FunctionName will cause replacement. Interestingly, explicitly specifying the default value will also cause a replacement if that property was previously omitted (even though the value isn’t actually changing).
CloudFormation will also fail if it needs to replace a resource that has a custom name defined. You will get an error similar to:
CloudFormation cannot update a stack when a custom-named resource requires replacing. Rename my-resource and update the stack again.
I expect this is because it attempts to create the new resource before deleting the old one, which isn’t possible if the name has to be unique.
S3 Bucket
There are several incompatible settings that determine which S3 bucket your project is uploaded into. The --s3-bucket parameter specifies the bucket explicitly, and --resolve-s3 automatically create an S3 bucket to use for packaging and deploying for non-guided deployments. If you specify both the --s3-bucket and --resolve-s3 options, then an error occurs, and if you specify --guided option, then the AWS SAM CLI ignores --resolve-s3.
Config Inheritance
The samconfig.yml file allows creating environment specific configs, but values in the config file don’t fall back to the defaults automatically. To enable this behaviour we can to use YAML anchors. Unfortunately the parameter_overrides property in samconfig.yml is a list, so if we need to override one property we need to also pass in any that are set in the default block.
version: 0.1

default:
  deploy:
    parameters: &default_deploy_parameters
      region: us-west-2
      on_failure: ROLLBACK
      capabilities: CAPABILITY_IAM
      parameter_overrides: ServiceName="my-service"

test:
  deploy:
    parameters:
      <<: *default_deploy_parameters
      stack_name: my-stack-playpen-test
      s3_bucket: test-us-west-2-lambda-packages
      s3_prefix: aws-sam/my-stack/test
      parameter_overrides: Environment="test" ServiceName="my-service"

prod:
  deploy:
    parameters:
      <<: *default_deploy_parameters
      stack_name: my-stack-prod
      s3_bucket: prod-us-west-2-lambda-packages
      s3_prefix: aws-sam/my-stack/prod
      parameter_overrides: Environment="prod" ServiceName="my-service"
Custom Parameters and Defaults
In Serverless Framework we often use the custom block to define fixed values that are shared within the template, but may vary across environments:
custom:
  defaults:
    slack_channel: "#random"
  test:
    slack_channel: "#test-events"
  prod:
    slack_channel: "#prod-events"

functions:
  my-function:
    environment:
      SlackChannel: ${self:custom.${self:provider.stage}.slack_channel, self:custom.defaults.slack_channel}
The most similar the custom block is probably a single level Mappings lookup, but it doesn’t support falling back to a default value:
Parameters:
  Environment:
    Type: String

Mappings:
  CommonValues:
    Test:
      SlackChannel: "#test-events"
    Prod:
      SlackChannel: "#prod-events"

Resources:
  MyResource:
    Type: AWS::Serverless::Function
    Properties:
      Environment:
        Variables:
          SlackChannel: !FindInMap [CommonValues, !Ref Environment, SlackChannel]
We can add the AWS::LanguageExtensions transform which allows setting a default fallback value, but the syntax isn’t pretty:
Resources:
  MyResource:
    Type: AWS::Serverless::Function
    Properties:
      Environment:
        Variables:
          SlackChannel: !FindInMap [CommonValues, !Ref Environment, SlackChannel, DefaultValue: !FindInMap [CommonValues, Defaults, SlackChannel]]
The IAM role you use to run sam deploy needs permission to use the AWS::Serverless-2016-10-31 transform (and AWS::LanguageExtensions if you use it). To do this we need to add a statement similar to the following:
 {
  "Version": "2012-10-17",
  "Statement": [{
     "Effect": "Allow",
     "Action": ["cloudformation:CreateChangeSet"],
     "Resources": [
       "arn:aws:cloudformation:*:aws:transform/Serverless-*",
       "arn:aws:cloudformation:*:aws:transform/LanguageExtensions",
     ]
  }]
}
I decided to allow any version of the Serverless transform, in any region, but you could pin it to Serverless-2016-10-31 instead. Interestingly I couldn’t find any reference to this ARN format in the Actions, resources, and condition keys for AWS CloudFormation. The only mention of it I found was this example policy in the CloudFormation docs.
Other interesting things
There are a few other interesting looking features that I’ve not explored yet.
sam init can take a template URL in cookiecutter format for starting a new project.sam sync looks like it can keep deployed code in sync by watching for local file changes? Still need to look into this further but it could be handy.
20 Nov 2024
While I was traveling recently I thought it would be useful to keep a second clock in the menu bar set to my home timezone. Hammerspoon seemed like it should be able to handle this, so after a bit of tinkering is what I ended up with:

It’s not perfect, but calculating the nextMinute at startup helps to keep the clocks fairly accurate by trying to get the menu to update as close as possible to the start of each minute. Calling the spoon’s new() method returns a separate instance, making it easy to add several clocks.
To add them to Hammerspoon just update init.lua:
local MenuClock = hs.loadSpoon("MenuClock")
MenuClock:new('🥝', 13):start()
MenuClock:new('🏔️', -7):start()
MenuClock:new('🇬🇧', 0):start()
You can also adjust the time format for the each clock in case you want to show 24h time, or just the hour.
uk = MenuClock:new("🇬🇧", 0)
uk.time_format = "%I%p"
uk:start()
The full code for the spoon is available on GitHub.
25 Sep 2024
Some notes I made on building a python lambda package, because I spent far too much time on it this week. In all these examples I’m using a requirements.txt to install dependencies into a lambdaPackage directory.
Install packages that are compatible with the lambda environment
We need to make sure pip downloads packages that will be compatible with the lambda runtime environment. AWS suggest using the --platform and --only-binary flags when installing dependencies:
$ pip install --platform manylinux2014_x86_64 --only-binary=:all: --requirement requirements.txt --target lambdaPackage
The problem I found with this approach is if one of the dependencies doesn’t have a release that matches those parameters (compare orjson with pyleri for example).
As an alternative, we can run pip inside the AWS SAM build container images, which should ensure we get a compatible set of packages:
$ docker run -it --rm --entrypoint='' -v "$(pwd):/workspace" -w /workspace public.ecr.aws/sam/build-python3.10 pip install -r requirements.txt -t lambdaPackage
Don’t accidentally include a top level folder inside the zip file.
If we create the archive with zip lambdaPackage.zip lambdaPackage/* we end up with a zip file that includes the lambdaPackage directory. This was actually quite annoying to troubleshoot, because when you extract the zip file in macOS it will create this enclosing folder for you if it doesn’t exist (instead of spewing files all over the current folder), so it took me a while to realise what was happening.
To add only the contents of lambdaPackage to the archive, we want to run the zip command from inside the lambdaPackage directory:
$ pushd lambdaPackage
$ zip ../lambdaPackage.zip .
$ popd
You can also use the zipinfo command to examine the contents of the archive.
Check File Permissions
Lambda needs to have permission to read your files and dependencies. The expected permissions for python projects are 644 for files and 755 for directories. You can update everything with:
$ chmod 644 $(find lambdaPackage -type f)
$ chmod 755 $(find lambdaPackage -type d)
Slim down the dependencies
The maximum size of a lambda package is 250MB (unzipped), including all lambda layers. There are a few things we can do to slim down the resulting package that shouldn’t impact the lambda environment.
Running pip with PYTHONPYCACHEPREFIX=/dev/null will discard all the __pycache__ files out (possibly at the expense of slower cold start times). Since we won’t be running pip again it’s also usually safe to delete all the .dist-info files.
Some of the biggest wins can be found with modules like googleapiclient (75MB - about 30% of our allowance!) which include large model files describing each service they support. In this case it should be safe to delete the model file for any services we won’t be using. You’ll find them in googleapiclient/discovery_cache/documents/. Botocore had a similar issue, but since 1.32.1 now stores these model files compressed.
Precompiling modules
One thing I didn’t try was precompiling the dependencies. AWS actually advises against this but as long as it’s run inside the appropriate AWS SAM build container images the result should be compatible with the lambda runtime, and could speed up cold start times.
13 Aug 2024
In our AWS environment, no hosts are exposed to the internet in public subnets. Instead, we use a feature of AWS Systems Manager if we need to connect to instances. AWS Systems Manager Session Manager works by running an agent on each instance which opens a connection back to the Systems Manager service. To connect to an instance, someone with the appropriate IAM permissions can use the aws ssm start-session command, or the connect button in the AWS console. This connects to Systems Manager over HTTPS, which sends a message to the agent on the instance to set up a bi-directional tunnel between the client and the instance. Commands can then be sent over this tunnel to the agent, and output is sent back over the tunnel to the client.
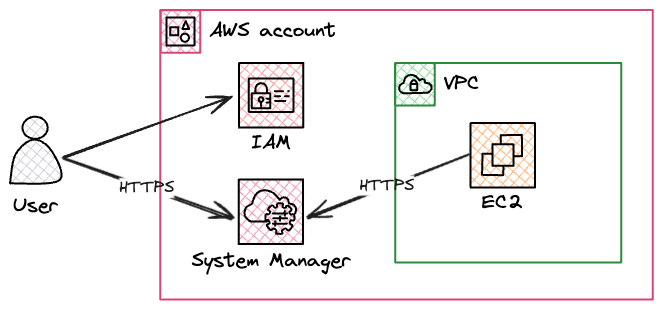
This is usually all we need to connect to instances for troubleshooting etc, but occasionally we may need to transfer a file, and to do that we need to use another feature of Session Manager which allows us to forward ports from the remote instance back to our client. Conceptually this is much the same as when we use SSH to forward a remote port with ssh -L 8080:localhost:80 - port 80 on the remote instance can be accessed on our local machine on port 8080. In the case of Session Manager, the connection is tunnelled over HTTPS instead of SSH, but the result is the same.
To upload a file to the instance we want to use the scp command.
First we update our .ssh/config file to tell ssh and scp to use a proxy command when connecting to instances.
Host i-*
  IdentityFile ~/awskeypair.pem
  User ec2-user
  ProxyCommand sh -c "aws ssm start-session --target %h --document-name AWS-StartSSHSession --parameters 'portNumber=%p'"
Since we will be connecting to the sshd service on the instance (instead of the SSM Agent), we need to have valid credentials to log in - in this case the private key used to launch the instance. You could also leave out the IdentityFile and User settings and instead pass in the appropriate authentication options on the commandline when you connect.
We should then be able to connect to the instance over ssh by using:
Or transfer files with:
scp somefile.txt i-0123456abcdef:/tmp/somefile.txt
It’s worth noting that when we do this, the SSM Agent is no longer able to save session logs to CloudWatch or S3 for us, since it doesn’t have access to the encrypted SSH traffic.
18 Jul 2023
I recently had to use terraform to add a capacity provider to an existing ECS cluster.
After adding a default capacity provider to the cluster, existing services still have a launch_type=EC2, so we need to update them to use a capacity_provider_strategy in order to use it. Unfortunately we can’t do this in terraform due to a long-standing bug:
When an ECS cluster has a default_capacity_provider_strategy setting defined, Terraform will mark all services that don’t have ignore_changes=[capacity_provider_strategy] to be recreated.
The ECS service actually does support changing from launch_type to capacity_provider_strategy non-destructively, by forcing a redeploy. Since this uses the service’s configured deployment mechanism there’s no disruption.

We can also set this using the CLI:
aws ecs update-service --cluster my-cluster --service my-service --capacity-provider-strategy capacityProvider=ec2,weight=100,base=0 --force-new-deployment
If for some reason we need to revert, ECS also supports changing back from capacity_provider_strategy to launch_type, however the option is disabled in the console:
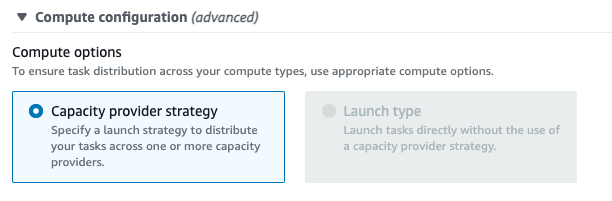
As a workaround, we can pass an empty list of capacity providers to the update-service command, which will result in the service using launch_type=EC2 again.
aws ecs update-service --cluster my-cluster --service my-service --capacity-provider-strategy '[]' --force-new-deployment